
A Fabulous Course from the Fazios
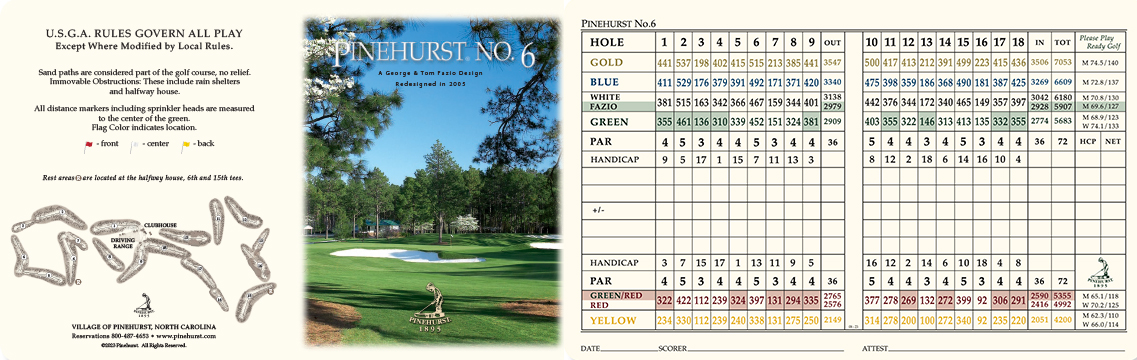
In 1975, PGA professional golfer Tom Fazio and his course designer uncle, George, set out to create a course in the heart of Pinehurst yet distinctly set apart in its own style. The result was No. 6, an undulating track that rewards big, bold drives and requires more aggressive approach shots. The course was renovated in 2005 to anchor it aesthetically to Pinehurst, even as it continues to carve out its own reputation.
Plan Your Stay-
Yards 7,053
-
Par 72
-
Opening Year 1979


- Gold
- Blue
- White
- Fazio
- Green
- Cardinal
- Red
- Yellow

Walk in the Footsteps of Legends
Far more than simply a golf resort, Pinehurst is where the American golf story is rooted, and where it continues to flourish. And while Payne Stewart’s famous putt that won the 1999 U.S. Open may be seared in our collective consciousness, behind it are archives of equally impressive moments from the past 100 years.
Join us for the best golf in North Carolina, play on some of the finest golf courses in the world and write your own chapter in our continued saga.

Beyond the Course
Experiencing the legendary Pinehurst courses goes beyond the iconic greens. When you step through the interactive historic hallway, you step back in time, alongside greats from Ben Hogan to Bryson DeChambeau. You’ll soon come to know Pinehurst’s friendliest face, Larry Goins, a bag drop greeter who’s made golfers feel at home for over 40 years. And when you start a day on the green at the 91st Hole and end it at The Deuce, you’ll be fueled from the first hole to the final handshake.
The Pinehurst experience is yours for the taking — so tee up, breathe out and take your swing. It starts here.
Shop Exclusive Pinehurst Gear
Shop for your favorite Pinehurst-branded merchandise, including polos, headwear, outerwear and more, and take the spirit of the game home with you.


Request Call Back
Tell us a bit more about your desired trip and we will call you back within 48 hours at your requested time.
Explore Other Courses


Packages
Plan your stay
Book Your Next Trip to Pinehurst
Whether your goal is getting in as many holes as possible or spending a leisurely weekend on the course and at the spa, our packages will help you find the ideal itinerary.