Eric Alpenfels knows golf.
As the Director of Golf Instruction here at Pinehurst, he shares his knowledge with golfers of all skill levels looking to improve their game.
Alpenfels, who has been recognized by Golf Magazine as one of the “Top 100 Teachers in America,” recently shared with the publication his advice about how to improve golf grip.

Eric Alpenfels, Director of Golf Instruction
Alpenfels writes: “In a recent poll of Top 100 Teachers, 81 percent acknowledged that the grip is one of the first things they work on with new students. I’m not suprised. Most golfers see the grip as simple — grab the handle and squeeze. But there’s a lot more to it, and making even the slightest error can have serious ramifications in your swing. (By the way, the 19 percent who said their students’ grips don’t need work admitted to coaching only pro players. See a pattern?)
“If you’re concerned about your grip, then follow these simple steps. This is the method we teach at the Pinehurst Golf Academy, and it’s sequenced to set your hands in the correct positions and avoid the most common grip errors. It’s a 5-second procedure that will give you the power and control you’ve been missing.”
Here’s a look at the piece titled “New Way to Take Your Golf Grip.”
Give it a try.

Step 1: Placing the handle With your right hand, grab the shaft where it meets the grip and hold the club out in front of you at a 45-degree angle. Turn your left palm toward you and then set the grip in the area between your first knuckles and the top of your palm. (Photo by Shecter Lee)
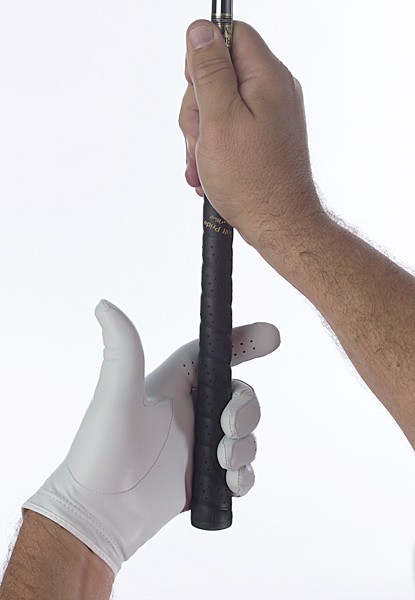
Step 2: Securing your left hand Without changing the position of the grip in your left hand, curl your left-hand pinkie, ring and middle fingers around the handle. If you’ve done it correctly, it should feel as though every part of the undersides of these fingers is in contact with the grip. (Photo by Shecter Lee)

Step 3: Setting your left thumb Again, without changing the grip’s position, “roll” your left thumb over to the right side of the handle while curling your left index finger around the grip. Make sure that the fatty portion at the base of your thumb is pressing directly down on the handle. (Photo by Shecter Lee)
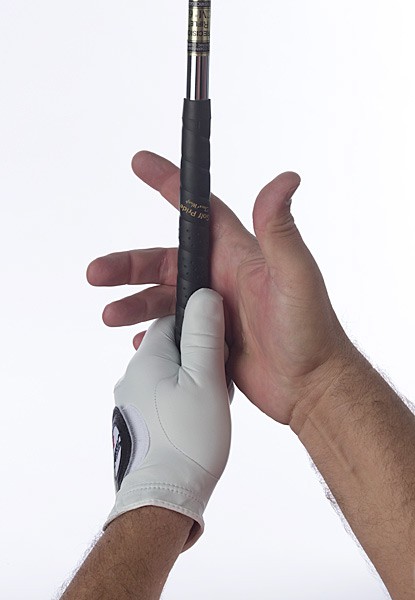
Step 4: Slide your right hand toward your left and, just as you did with your left hand, allow the shaft to sit between your first knuckles and the base of your palm. (Photo by Photo by Shecter Lee)
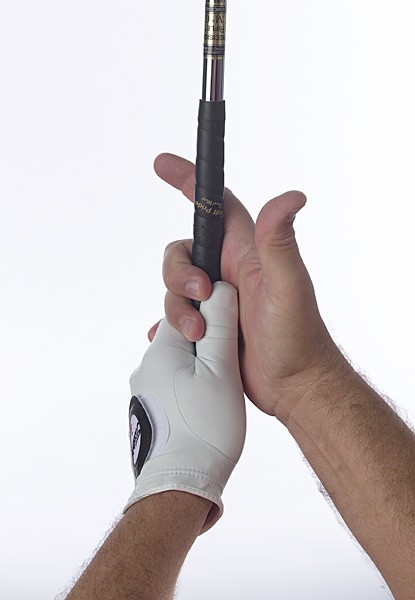
Step 5: Wrap your right pinkie into the fold between your left middle and index fingers (or interlock them) and your right ring and middle fingers around the handle. Your connection here is critical; add pressure to the handle with these last two fingers. (Photo by Shecter Lee)
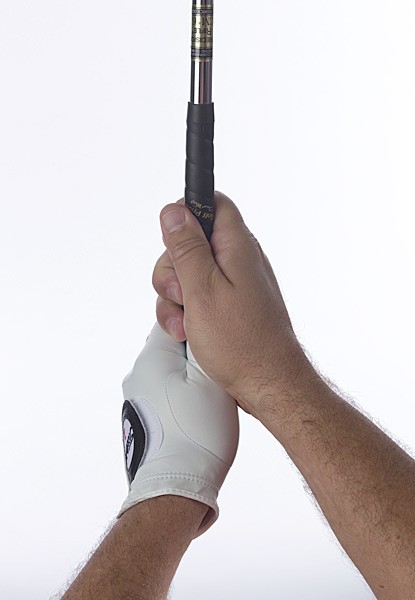
Step 6: Place the lifeline on your right palm directly over your left thumb by “rolling” your right thumb to the left while curling your right index finger around the handle. You should feel pressure from the fatty pad at the base of your right thumb on your left thumb. (Photo by Shecter Lee)
Tee Off. Then, Log On.
See what others are doing and share your own Pinehurst adventures.
Share the moment


